Collaboration is key in modern software development, and GitHub has become an essential tool for developer teams. However, when working on collaborative projects, encountering merge conflicts on GitHub is almost unavoidable. These conflicts can interrupt workflows and frustrate developers, but with the right knowledge and tools, resolving them becomes a straightforward and manageable process.
In this article, we’ll explore the topic of GitHub merge conflicts, discussing what they are, why they happen, and how to resolve them efficiently. Additionally, we’ll share practical tips to prevent merge conflicts and improve your GitHub workflow for smoother collaboration.
TL;DR:
- GitHub merge conflicts occur when two branches make changes to the same part of a file or have incompatible updates.
- Resolving conflicts involves identifying conflicting code, editing the file manually, and completing the merge.
- You can prevent conflicts by regularly merging changes, communicating with your team, and following best practices.
What are GitHub Merge Conflicts ?
A GitHub merge conflict happens when Git cannot automatically combine changes from two branches. This situation arises because Git cannot reconcile differences between the changes made on separate branches without human intervention.
When developers work on the same project, especially in teams, conflicts are bound to happen due to overlapping changes in the codebase. Merge conflicts are Git’s way of signaling that it needs assistance to resolve which changes should take precedence.
Why Do Merge Conflicts Occur ?
Understanding the root causes of GitHub merge conflicts is very important to help understand how to prevent them. Following are some common scenarios where merge conflicts can occur.
1. Simultaneous Edits
When two contributors make changes to the same part of a file on different branches, Git cannot determine which change to prioritize. For Example,
console.log("Hello World!")   // content on Branch A
console.log("Hello")          // content on Branch B
At this point, Git is unsure whether to apply the changes from branch A or branch B because edits were made simultaneously in both branches. It requires human intervention to determine which changes should be kept or how they should be merged.
2. Divergent Histories in Branches
When two branches evolve independently over an extended period, the differences between them tend to accumulate. This creates more complex scenarios where Git cannot automatically determine how to combine the changes from both branches. As a result, the merging process becomes more challenging, often requiring manual intervention to resolve conflicting changes and integrate the branches effectively.
3. File Renames or Deletions
If one branch renames or deletes a file while another branch makes modifications to the same file, Git encounters a conflict because it cannot automatically determine the correct course of action. Should it prioritize the renamed or deleted file, or should it preserve the modifications made in the other branch? This requires manual intervention to decide how to handle the changes and make sure that the final merged state aligns with the intended outcome.
4. Binary Files
Unlike text files, binary files such as images, videos, or compiled executables cannot be automatically merged by Git because they lack a line-by-line structure that Git uses to detect and merge changes. When changes to the same binary file occur in different branches, Git is unable to reconcile them, which requires human help to decide which version of the file should be kept or how to resolve the conflict effectively.
5. Large Teams
When a project has many contributors working on the same codebase, the chances of overlapping changes being made to the same file or lines of code significantly increase. This can lead to merge conflicts, as multiple people may be editing or restructuring the same sections simultaneously, requiring careful coordination and resolution to integrate everyone’s work seamlessly.
Resolving GitHub Merge Conflicts

If you are wondering how to resolve GitHub merge conflicts, it requires careful manual review and editing to make sure that all changes are integrated seamlessly. Following is a step-by-step guide to help you navigate and resolve merge conflicts effectively.
Step 1 – Check for Conflicts
There are two ways on where you can check for conflicts.
To identify conflicting files in your local repository, run the following command:
git status
Conflicting files will be listed under both modified, indicating that the same file has been edited in both branches.

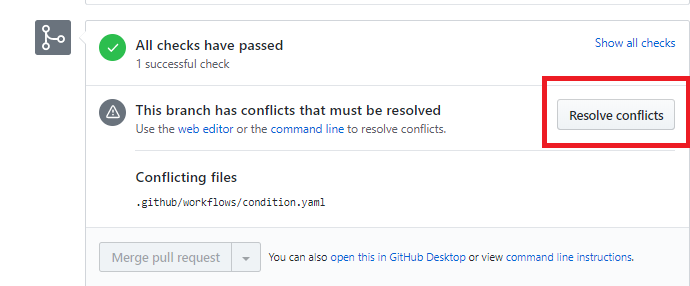
Additionally, if you’re reviewing a pull request on GitHub, conflicts can also be identified in the PR interface. If there are merge conflicts, GitHub will display a message saying This pull request has conflicts that must be resolved near the top of the PR. You can click on the Resolve conflicts button to view and manage the conflicts directly on GitHub.
Step 2 – Open the Conflicted File
Once you click the Resolve conflicts button, either on GitHub or within your IDE like Visual Studio Code, the conflicting file will be highlighted and marked to indicate the areas where conflicts exist. You’ll typically see the conflicting sections enclosed within special markers, such as
<<<<<<< HEAD
Your changes
=======
Changes from the branch
>>>>>>> branch-name
These markers clearly show the conflicting sections, the code between <<<<<<< HEAD and ======= is your code, while the code between ======= and >>>>>>> branch-name represents the changes from the other branch. You’ll need to manually decide which changes to keep, remove, or combine before proceeding with the merge.
Step 3 – Manually Edit the File
At this stage, once you’ve identified where the conflict occurs in the file, you’ll need to choose which changes to keep, remove, or combine. For instance, if you prefer your code over the changes from the other branch, you can simply delete the conflicting code along with the special markers. After resolving the conflict, your final code should be clean and look like this, without any markers or unnecessary code
console.log("Final version of the code");
This makes sure that the conflict is resolved, and the file is ready to be committed. Make sure to carefully review the changes before proceeding to avoid any unintended issues.
Step 4 – Mark Conflict as Resolved
After editing the file and making sure that you’re satisfied with the resolved code, you can mark the conflict as resolved.
If you’re using GitHub or an IDE, you can simply click the Mark as Resolved button to indicate that the conflict has been handled. On the other hand, if you’re working in the terminal, you can run the command git add <file-name>.
This will stage the file as resolved, preparing it for the next steps in the merge process. Make sure to review your changes before proceeding to make sure everything is in order.
Step 5 – Complete the Merge
After resolving all merge conflicts in your Git repository, you can complete the merge. GitHub now has the necessary information to know which changes to keep and which to discard. Once the conflicts are resolved and staged, the merge will proceed successfully, and your branch will be up to date with the intended changes.
Tips to Prevent GitHub Merge Conflicts

Merge conflicts are a common and entirely normal occurrence in version control. They arise when Git encounters confusion and is unable to automatically merge changes, requiring human help to determine the correct course of action.
While resolving conflicts can sometimes be frustrating, there are several strategies you can implement to reduce the likelihood of conflicts in your project and make the process smoother. Following are some useful tips to help you stay cautious and minimize potential issues.
- Merge Frequently
- Frequently merging the main branch into your feature branch helps keep your codebase up-to-date, reducing the risk of large, complex conflicts down the line.
- Communicate with your Team Often
- Regularly check in with your team to ensure you’re not working on the same sections or files, minimizing the chances of overlap and conflicts.
- Use Feature Flags
- Use feature flags to enable continuous development without the need for long-lived branches, allowing for easier integration and fewer conflicts.
- Break Large Changes into Smaller Commits
- Keep your changes small and manageable. Incremental commits make it easier to spot and resolve conflicts early, before they become complicated.
- Adopt a Code Ownership Model
- Assign clear ownership of files or modules to specific developers. This minimizes the risk of multiple people modifying the same code and helps prevent conflicts from occurring.
Conclusion
While merge conflicts may seem daunting at first, they are a natural part of collaborative development. With practice, resolving conflicts becomes a straightforward process. By understanding the causes, following the resolution steps, and adopting preventive measures, you can minimize disruptions and keep your projects running smoothly.
Remember, the key to managing merge conflicts lies in proactive communication, regular merges, and utilizing the right tools to simplify the process.
FAQs
How do I identify a merge conflict?
- Merge conflicts are flagged during pull requests on GitHub or through errors in the Git command-line tool.
Can merge conflicts be avoided completely?
- While conflicts can’t be eliminated entirely, following best practices like frequent merges, effective communication, and smaller commits can reduce their frequency.
What happens if I ignore a merge conflict?
- Ignoring conflicts will leave the merge incomplete, preventing the branch from being fully integrated.
Are there tools to simplify resolving merge conflicts?
- Yes, tools like GitHub’s web editor, Visual Studio Code, IntelliJ IDEA, and third-party apps like Sourcetree or KDiff3 help resolve conflicts more efficiently.


